Get Free Shipping on All Orders of $45 or More!
Basic Lamp Wiring Tips & Techniques: DIY Lighting Projects

Is Your Lamp Socket Safe?
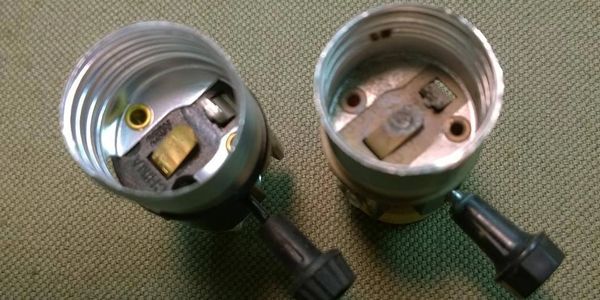
Incandescent light bulbs generate a lot of heat, much of which is transferred to the socket itself. Over time, and with repeated use, this can lead to a faulty socket. If your socket looks like the one on the right, IT IS NOT SAFE! Replacing an old socket with a New Socket is easy to do and will give you peace of mind from a safety standpoint.
Lamp Wiring Basics
As far as basic lamp wiring tips and techniques, the first thing that you need to know about is the lamp cord. You will need to use an 18/2, SPT 1 cord. This is an 18-gage wire with 2 cords inside a plastic sheath. An SPT 1 wire is a little slimmer and slicker than an SPT 2, making it easier to snake through narrow lamp tubbing. When attaching the cord to a new socket, make certain that the "hot" wire (which is usually black or smooth-sided on a solid-colored lamp cord) is connected to the gold-colored terminal post (gold-colored screw head) on the socket. Also, make certain that the "neutral" wire (which is usually white or is ribbed on a solid-colored lamp cord) is connected to the silver terminal post (silver-colored screw head) on the socket. When rewiring a lamp, just remember; Gold is Hot, Silver is Not! Cords that are the same color will usually have a ribbed indentation on the "neutral leg" of the cord and are smooth on the "hot" side of the cord. Be sure to wrap the cord clockwise around the terminal post, which will turn in the same direction when tightened

How to Remove a Stubborn Lamp Socket Sleeve
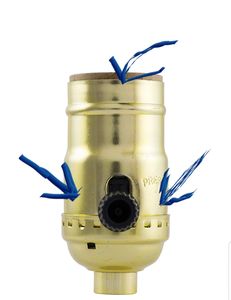
When it comes to basic lamp wiring tips and techniques sometimes, the biggest obstacle is simply getting the old socket sleeve off. The best way is to use a small flathead screwdriver and pry it open on either side of the opening there the stem (turn knob) comes out, just below the "Push Here" mark on the side. It's also helpful to push back at the top at the same time. (See arrows in picture) If all else fails, soak it overnight with some spray lubricant or WD-40 a
Pulling Wire Through Tight Tubes
If you are working with a floor lamp and rewiring the arms that extend out from the wiring cluster, it can sometimes be a challenge getting the cord through narrow tubing. It is sometimes helpful to insert a piece of 20 gage picture hanging wire and attach it to the cord and pull it through. To do so, simply punch a hole in the center of the cord at about an inch back from the end. Insert the wire through the hole and bend it back over itself with a pair of plyers. Then, twist tightly. Push the wire through the tubing until it comes out the other end. Then pull your lamp cord through with a push, pull combination to reduce resistance.

Tackling Tight Tubes
Wattage Warning Label
Always pay close attention to socket sleeve wattage labels! They tell you the maximum wattage recommendations for the bulb to be used in it. A light bulb that has a higher wattage than the recommendations on the socket sleeve cover can easily overheat, causing a cord discoloration like the one pictured here. This is not safe!

Wattage warning
.jpg/:/rs=w:400,cg:true,m)
Is Your Lamp Socket a Standard or a 3 Way?
It's easy to tell whether you have a standard or 3-way socket. Simply remove the bulb and look at the base of your socket. All Sockets have a copper-colored prong in the center of the socket like the one on the left in this picture. However, a 3-way socket has an extra off-set silver-colored prong to engage a 3-way bulb. For additional information on DIY Lighting Projects, Check out the "Tips & Techniques" page on our website. 🔌
What is a Socket Insulator?
With lamp repair and rewiring, it’s important to know what a socket insulator is. An insulator is a molded paper sleeve that snugly fits between your lamp socket (as well as the live wires connected to it) and the metal socket sleeve on the outside. With repeated use and constant exposure to heat, these paper insulators can become dried out and brittle, causing the live wires inside to become dangerously close to the metal sleeve on the outside. This rewire lamp socket condition can cause an electrical shock, a blown-out socket, or worse. Be sure to check the condition of your Paper Insulators when replacing your socket.
Cookie Policy
We use cookies to analyze website traffic and optimize your website experience. By accepting our use of cookies, your activities (such as pages visited on our website) will be collected along with other visitors.